Thursday, September 6, 2012

Subbing


I started this post a LONG time ago...planning to add to it.  Shortly after I realized that I hate subbing!  So, no more stories, but I'll share these few chuckles...

One morning my class was to join another class for a movie on Desserts (as I quickly read on the lesson plans).  I thought, "What a fun lesson!  I wonder if the kids get to eat any desserts while we're there?!"  Imagine my surprise when the movie started and the narrator began speaking about the Gobi DESERT!  How boring that lack of one S made our day.

Another blonde moment was when we got to the handwriting assignment.  The teacher's handwritten note said, "Handwriting CD".  While the kids were at recess and I was getting ready for the next portion of our day, I kept looking at "Handwriting CD", trying to figure out exactly where the CD would be and how in the world a CD could be used to help with handwriting.  Sad to say, but it took me a good minute or 2 for it to dawn on me that the C & D were written in cursive and the kids were supposed to practice writing the capital C & D in cursive!

School broccoli gives me MAJOR gas!


Tuesday, May 29, 2012

Geared Up for Summer

This morning the kids and I sat down and wrote out some of our summer goals.  Fun things we want to do, people we want to have playdates with, ways to keep up with learning and chores that can be done.  I want a good part of our summer time to be intentional.  The work and the fun!  I don't want the summer to pass by and leave us with a "we should have..." feeling.  So, we did some planning.

After we were finished our brainstorming, we busted our butts for about 2-3 hours and CLEANED the heck out of the house!  Daddy was QUITE impressed when he came home.  I can't explain why, but I clean much better when someone else is home, even if it's the kids.  If I have the house to myself, I tend to be less constructive.  Hence, the messy house since last August for a while.

Tonight I took the time to make checklists for the learning that we want to do this summer.  One checklist is just for reading.  I am requiring 3 chapter books and 50 short books over the summer.  When this is done, they get a jumbo sized candy bar.  (Side note: please, no one fill them in on the fact that these only cost $1 and they could easily buy one themselves if I let them.  They think that getting a jumbo candy bar is like the best thing EVER, so let's just keep them believing for a while!)  Claire has already read 14 books, Garret, 10 and Gavin, 8.

The second checklist includes all the other learning stuff...journaling, mad minute tests, art projects, worksheets, etc.  On this checklist I put a box for each subject, each week.  Most of this stuff is required...and not very hard to accomplish (2 of the categories are "Play on coolmath.com for 30 min" and "Play on toytheater.com for 30 min").  I haven't decided on the reward for completing every task, but it will be a biggie!  Maybe Kings Island.  Something that we would possibly do anyway, so by making it the reward we're not out extra cash. ;)  I also added one "lofty" goal to the list, which is learning multiplication tables.  I put a checkbox for x1 through x12.  I'll be happy if they learn through x5, elated if any further!  Since x1, x2 & x5 are pretty easy, it's really only x3 & x4.  They should be able to memorize that and get a jump on 3rd grade math!

Since the kids were tiny, I have always assigned colors to them...pink, blue and green.  Sometimes purple can sub for pink.  Sometimes yellow for green.  Bottles, sippy cups, backpacks.  Anything that is picked out by color will automatically be assigned to a certain child.  Because I'm all about efficiency (and if it weren't in my DNA to be that way, then having triplets would have probably forced it onto me) we had 3 sippy cups.  I found the brand and style that I liked, bought our 3 colors and washed and reused the same 3 all the time.  We didn't have any other sippy cups in our house, until we were given 2 other randomly colored cups (same brand and style, but not color).  These 2 cups eventually disappeared.  I don't have proof, but I am almost certain that one of the kids (probably Claire, who is most like mama) threw the rouge colored cups in the trash!  I didn't mind.  To be honest, I had thought about doing the same myself.  I used our long-standing color-coding system on the reading and learning charts.

For chores, I was able to re-instate our "chore card" system.  I don't make the kids do many chores during the school year.  They have to clean their rooms, bring down and put away their laundry and do anything else that we ask of them (most often that is load or unload the dishwasher).  But no standing, daily chores.  They are only home for a few hours and I don't want them to spend the whole time working.  But during the summer....now that's a different story.  With 8 extra hours to fill during the day, I feel no guilt in making them help out.  We came up with the chore card system when the kids were in kindergarten.  We have several index cards in a magnetic holder on the side of the fridge.  Each card has a different chore written on it.  Before anything else is done for the day, the chore cards have to be done.  This helps solve more than one problem because my early-rising boys are less motivated to get up early when they know they will be doing chores before they watch TV or play video games.  However, to encourage them to do the chore cards, I added in "watch 1 TV show" and "play 15 min. of video games" as two of the chores.  They are willing to do all the other chores without much fuss just to get to those 2 cards.  That idea had to be given to me by God, because it has worked like a charm all these years.

I have one last thing yet to do.  I have to make some sort of FUN checklist.  I've seen a few ideas on Pinterest - a bingo board or a simple "bucket list".  Last summer, Claire and our neighbor tried to come up with a point system, a la "Judy Moody and the Not Bummer Summer", but it was too complicated.  And she made it on a dry erase board...which, of course, got erased.  I'm gonna have to reel the kids in a bit on their lofty ideas of a fun summer.  We can only afford so many excursions to expensive locations.  Today we tried to come up with more relatively easy and free/cheap ideas.  A few of those are...

Science Experiment Day (finally do all those fun things that I've pinned)
Bubble Day
Cookie Baking Day
Water Obstacle Course Day
Hike at local parks
Picnic
Movie Day (watch movies and eat popcorn ALL day)
Fair Food Day
Water Balloon Fight
Stay up REALLY late

 It's the start of a new summer!  I really hope we make some lasting memories this year.  And keep most of the knowledge they gained in second grade.  I'm sure there will be many days where they don't feel like doing anything constructive and neither do I.  That is perfectly fine with me.  I'm cool with a big part of the summer just being summer.  No work.  No plans.  Just go out - or stay in - and play!  However, I think by doing this little bit of thinking, planning and prepping up front, our summer will be much more productive and fun overall.  I love having my kids home and want to make every moment count in some way!!

I don't think there's a way to attach an excel document to a blog (or if there is, I'm clueless), but since most or all of my followers personally know me, feel free to send me a message (comment, facebook, email, text, whatever) if you'd like me to e-mail you the documents to edit and use as torture for your own children!

Saturday, December 10, 2011

Crayon Monogram Tutorial

I saw several versions of these crayon monograms on Pinterest.  I pieced together ideas from different tutorials and this is what I came up with.

You will need:
New crayons - I used all the pretty colors from a box of 64 making 2 letters
Old crayons - for filler and practice
Frame - I used a $2.98 black plastic frame from Walmart.  You could go more expensive.  My only requirement was the the frame was thicker than a crayon so the crayons wouldn't stick out past the frame.
Razor blade knife - I'm not sure what these are called, but I think they cost about a dollar.  The blade slides up and you can break off the tip to get a new sharp point.  You could try other knives but when I explain my cutting method, you'll see why I like this one.
A cutting board - mine obviously needs a good bleaching!
Glue - I used hot glue but I think tacky glue would also work well
Paper - I used white cardstock...big enough to fit the frame
Letter - either printed or drawn.  I used Elephant font and made it as big as it would fit on a regular sheet of paper.  Then I adapted it to fit my crayon size and look right.
Pencil and Pen
Scissors
Whatever random box or book that will work as a flat surface and is nearby if you're doing this on the floor in front of the TV like I did.


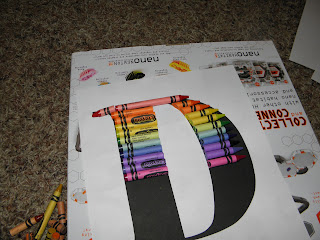
Start by laying crayons on the printed letter.  I did a few tries with old crayons and brown crayons (cuz I wasn't going to use them in the finished letter) to get the spacing and the cutting technique down.  With your razor blade out past the point that it's safe, but just right for rolling completely around the crayon, lay the blade across the crayon and use it to roll the crayon along the cutting board.  Ideally your line will be straight and you will have cut through the paper all the way around the crayon.  You will have also scored the crayon and it will snap right where you've scored it.

The angle cuts are harder, but I think they are what make the whole thing look more finished.  I used a sawing motion to get through as far as I could and tried not to tear the paper.  Only a few crayons gave my trouble.  Most cut pretty easy, even on an angle.
Note: see the red tip at the very top of the letter.  That's where the old crayon bucket came in handy.  I found the same color of red to make the pointy part (serif, maybe?) stick out farther, since one crayon length wasn't wide enough.

Keep filling in, cutting crayons at different lengths.  It's not shown, but up through about the green zone, there were middle parts of the crayon that were just thrown out.  By the blue, I was using the whole crayon with just one cut.
You can see how I adapted my printed letter to fit the crayons better.  I slimmed down the right front of the D.  If I had left it full size, 1 crayon wouldn't have covered the full width.

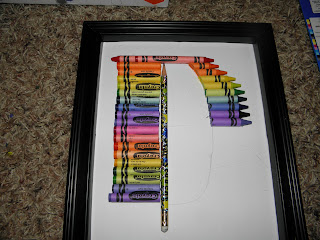
At this poing I wanted to check how my letter was going to end.  I used different crayon pieces to fill in spaces (on the left), but also paid attention to my rainbow pattern (on the right).

Using the cut crayons from the top section, I mirror imaged them from the bottom up.  So, the orange crayon that was already cut at the top was used to measure and cut the periwinkle crayon at the bottom...and so forth, to make it symetrical.

Next I gently rolled the crayons off the D paper, keeping them in their places.  Then I cut out the D, but narrowed it down quite a bit.  I used this to lightly make lines on my white cardstock so I'd know where to glue the crayons.  Each letter is different, but for the D, I really only needed the inside as a guide.
I think that a shadowbox frame would be really neat.  However, I am cheap, so I didn't get shadowbox frames.  I just put the white scrapbook paper in front of the glass (I did take the frame apart so that my paper is going behind the frame edges...thought I should add that in for the extrememly craftily challenged who may try this).

Time to start gluing.  If you are using a glue gun, once the glue touches the paper, it's pretty much dry, so make sure you have it in place before you press down.  Tacky glue would give you more time to adjust the individual crayons.  Something else to consider is whether or not you care which way your crayon label faces.  I just let mine fall randomly.  I guess that depends on just how OCD you are. ;)
Note: About halfway down the right side of my D, I realized that my crayons were wondering back and forth a bit so I used my pencil as a straight edge to keep the rest in line.
Something else to keep in mind...as you are gluing your curved edge, it will matter which part of your crayon faces up.  Line up the cut edge with the angle facing along the curve so that you know where to glue.

Not perfect, but not bad for my first try!  In the final picture you'll see that I also added the teacher's name at the bottom.  You could print this on the paper before you start.  I wrote it lightly in pencil first and then traced over with a fine point sharpie.

I decided to do the C a little differently.  I alternated the points of the crayons left and right.  I think it turned out pretty cool too.  You can see how I altered the shape of the printed letter here too.

Here are my finished letters.  I still have a W to do.  Might try it out of pencils since I used up all my good crayons on these 2!

Thursday, December 8, 2011

We need a little Christmas

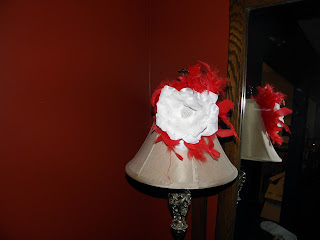
Looking for a new, fun way to decorate for Christmas?  Buy a red (or white, or green, or all 3) feather boa!  Cut it up and wrap it in fun places.  I bought one at our old house where I had 3 slim, black shelves on the wall.  I cut lengths for each shelf, took off my regular knick-knacks and replaced them with Christmas-y ones.  It was really cute.  I don't have the shelves anymore, so I improvised with the boa pieces.  I wrapped them around 4 candles on wroght iron stands.  I put them around another candle that's in a bird cage shaped thingie (feathers...bird cage.  Appropriate, right?).  And the last little bit I wrapped around a white flower that I stuck on a lampshade a while back.  BTW...got the white flower at Claire's for $1!
I think feather pieces would be really pretty in the tree too, if you had one of those matchy-matchy trees (which I don't).  How about surrounding a mirror or sticking out behind a picture?  Woven through a metal sculpture?  I think you can get away with more, decorating-wise, when it comes to the holidays.  I mean, you don't want to go OTT (over the top), but you can take some liberties.  For example, I have a picture that I gift wrapped and hung back on the wall for Christmas.  Actually, it's the picture with oranges in it behind the bird cage thingie.  At no other time of year would this be cute, but at Christmas, it just fits.  A little OTT is called for.
I also have an orange and black mixed boa that I bring out in the fall.  I like birdies in my decorating.  I guess feathers were the next logical step!
Go out!  Buy a BOA!  Go CRAZY!  Or at least look for one on sale after the season so you can go crazy next year. ;)


Wednesday, November 2, 2011

Summer Delight


I was taught this recipe my freshman year of college (who says you never use what you learn in college?!?).  One of my friends had to do a demonstrative speech and we reaped the fruits of her labor by being her guinea pigs for the pracitce round.
This simple, delicious dessert is always a crowd pleaser.  It looks so pretty and tastes so good, but requires no more work than a bit of chopping, stirring and dumping.  I've taken it many times to carry-ins and I'm always asked for the recipe.  It's also very light so you can have ten more than one helping without getting overwhelmed.
Since my freshman year seventeen a few years ago, I have made this dessert countless times.  Every time that my mom was around when I was making or had made it she never failed to ask, "What's this dessert called again?"  To which, I always replied (with less and less patience each time), "I don't know mom.  I just make it."  After the millionth 10th or so time that she asked, I finally just made up the name "Summer Delight".  I couldn't come up with anything more creative and everytime I say it, I think of Afternoon Delight, so I'm open to name suggestions.  Maybe something like Summer Trifle?  But then I'd have to re-train my mom on the name!!!  And I'm not opposed to having dessert ranked up there with "other" delights!
I am not a low-fat, no-fat, low-sugar, no-sugar type girl.  I like sugar.  I like fat.  It tastes good!  Real good!  However, this is one dessert that can easily be converted to all that low/no stuff and still be rather tasty.  Sugar free pudding w/ skim milk and lite cool whip.  I think angel food cake is relatively low fat/sugar, but I could be wrong.  Fruit is fruit...sugar, but the good-for-you kind.  That just leaves the chocolate chips, which you could possibly leave out if you're a Sugar Nazi (story for another time...let's just leave it as one of "those" moms that I encountered at my kids' pre-school), but please don't call it Summer Delight if you do.  Change the name to something way more boring for my sake, please!  Plus, dark chocolate is good for you, right?  Antioxidants and all that.
One last thing...sometimes it's hard to get good strawberries and kiwis in the winter.  Hence SUMMER delight.  I took these pictures with plans to blog back when it was summer.  Early summer, in fact.  I tried other fruit before, but it just didn't have the same ring for me.  You have to have that tarty bite of sweetness that only strawberries and kiwis create together.  I'm sure someone possesing a more distinguished pallette than I could make some suggestions (I'll drink day old coffee, reheated in the microwave and can't tell that much difference from the original stuff, so my pallette isn't up for the challenge of finding substitutions).


Ingredients:
1 lg or 2 sm packages of instant vanilla pudding *
Milk - enough to make pudding according to package instructions
Cool Whip - again, 1 lg or 2 sm *
Angel Food Cake - one, either store bought or homemade
Strawberries - 1 regular rectangular container (what is that, a pint? 2 pints? IDK)
Kiwis - 3-5 depending on size and how much you love kiwi
MINI chocolate chips (you have to buy a bag, but end up using less than half of it...the extras can be eaten by any dark chocolate lover than you know or mailed directly to me)**

*the size of pudding and cool whip probably depend more on your bowl size than anything else.  I usually buy based on whichever size is the best value at the time...it all tastes yummy in the end.
**do NOT be tempted to use regular size chips.  They get cold, hard and stick to your teeth.  Granted, there are worse problems than having chocolate in your teeth, but buying the mini chips is the way to go on this.


In a bowl that will ultimately be large enough to hold the pudding and the cool whip, make the pudding according the package instructions.
While the pudding is setting up in the fridge, clean, hull and slice the strawberries and peel and slice kiwi (or cut into small chunks).
Remove pudding from fridge.  Add  the cool whip, reserving some for topping, and stir to combine.

Now starts the layering.  I like to do 4 because it's easy for me to visually divide everyting into fourths.  If you're taking this to a party and have one of those pretty glass trifle bowls, you'll wanna break it out and be careful/fancy with your layering.  If not, just slop it in there cuz it all tastes the same in the end.

Layer 1: Angel food cake, torn/cut into small chunks/cubes (roughly 1")
Layer 2: Pudding/Cool Whip mixture
Layer 3: Strawberries and Kiwis
Layer 4: a generous sprinkling of Mini Chocolate Chips (maybe 1/8 cup-ish per layer)
**Repeat***
Top with dallops of reserved Cool Whip (but it looks pretty with just the fruit on top too).

Refrigerate.  You could serve right away, but it tastes better after sitting for a few hours or overnight.  The cake soaks up the pudding and the flavors just meld together.


Now's the part where you splash your face with flour and water and act like you've been slaving ALL day, so you get even more credit for your amazing creation!

By the way, anyone notice my slight obsession preference towards writing with strikeouts?  Anytime you can convey sarcasm thru writing, I'm on board! ;)

Monday, April 11, 2011

My favorite video clip ever!

This is probably my favorite video clip from our family videos.  The lighting was terrible and the camera was my first digital, therefore not great quality.  But it's still great to watch.  This would have been the summer before the kids turned 2.  We have watched this video tons of times and laugh every single time we watch. :)  Claire wanted a piece of ice so badly!

Friday, April 8, 2011

Pride!!!

Right now I am wishing like crazy that I did not give up facebook for lent.  I am bursting and the seams with pride and want so badly to post this there!  But, alas, if Jesus could fast in the desert for 40 days, surely I can not post on facebook for the same length of time.  Since I can't post there, you, my 18 followers, are gonna have to do.  Please comment so I'll feel the love and excitement!!!!

My daughter got an absolutely PERFECT report card!  First grade, so all Os (for outstanding) and all pluses under the individual grades (as opposed to minuses or checks), including behavior.  She could not have done any better on any area than what she did.  I almost cried over it!

OK, so I'm a little crazy.  All 3 of my kids have been on the honor roll every grading period so far (which also makes me very proud), but there have always been areas for improvement.  An S here, a check there, the occasional minus for something (usually behavior - DH's fault, for sure - haha).  I was one of "those" kids who had to get straight As every single time.  I cried when I got my first B in third grade, got only a few C's throughout junior high and high school and never got a D on anything.  So, although my kids do great in school and I brag on them like crazy and am so super proud of them, this level of perfection just swells me that much more with pride!

Sis, YOU ROCK!!!!!