A few years ago I started making pumpkin roll...and my husband started loving me all the more! This is kind of one of those "show off" desserts that aren't that hard to make but look like they are so everyone is super impressed. One of the first times I made one for a get-together someone said that it was so nice looking that they thought it was store bought. And I ain't gonna lie - I like me a compliment like that!!! So, I started making them for more and more get-togethers. The problem was that there were never any left-overs and Greg would get very upset that I made them for "everyone else" but not for him. So, now, whenever I make pumpkin roll, I can't make just one. I have to make at least 2. One for the get-together and one for Greg. Which I am happy to do since it makes him happy! And who doesn't want a happy husband, right? Not to mention, I get to eat some of the extra one too. So, over the years, making them in doubles all the time, I have developed a system down that works pretty good.
Don't be intimidated by the fanciness of this dessert. The only tricky part is getting the cake out of the pan after it's cooked. Other than that, it's a piece of cake (pun intended)! I've tried several different methods to prep my pan:
Cooking spray - didn't work - grrrrr
Crisco & waxed paper - waxed paper stuck to the cake - GRRRR
Crisco & flour - worked ok but dried out the cake more - eehhhh
"Baking" spray that house flour built in - worked great, but isn't cheap - humph
But, what I found that works the best of all and that I usually have on had is:
Plain Crisco put on VERY heavily, using a brush and making sure to get into all the edges very well.
I use a Pampered Chef baking stone that's 11x15. I think it's called the Bar Pan - it has sides like a normal cookie sheet. It is also WELL seasoned and very smooth. I wouldn't want to try this on one that wasn't.
The last trick for getting it out in once piece is to run something flat underneath the cake while it is still hot to make sure that it's all loose. I use a long offset spatula - the same one that I use for frosting a cake.
Pumpkin Roll
Cake:
3 large eggs
1 cup sugar
2/3 cup pure pumpkin (not pumpkin pie filling)
- I use 1/2 of a the smaller can 15oz for each cake so that I get 2 out of 1 can
3/4 cup flour
1/2 tsp baking powder
1/2 tsp baking soda
1-1/2 tsp cinnamon
1/4 tsp cloves
1/4 tsp nutmeg
1/4 tsp salt
Filling:
1 80z brick of cream cheese (do NOT use lowfat)
1/2 cup (1 stick) butter (do NOT use lowfat)
1-1/2 cup powdered sugar
1 tsp vanilla
Place eggs in bowl and beat on medium speed. Add sugar and beat on high until eggs are thick - about 3 minutes. While beating, combine flour, spices and salt in a separate bowl. Add pumpkin to eggs and mix to combine. Add flour mixture and stir slowly just until combined. You don't want to overbeat it and lose the "fluffiness" of the cake.
Pour into pre-greased pan, smooth with spatula and by wiggling the pan until it's evenly distributed. Bake at 375 for 12-14 minutes until it is just done. Do not overbake or it will be dry. Touch the top - it should spring back, but not stick to your fingers.
Place a thin "tea" towel on the counter and sprinkle with powdered sugar. After making sure that the cake is loose from the pan, quickly flip it out onto the towel. Sprinkle again with powdered sugar and roll up in towel.
After cake has cooled (about 30 minutes or more), prepare filling. Mix softened cream cheese and butter until well combined. Do not use lowfat or fat-free versions or the cream filling will be runny and not set up. Add powdered sugar and mix until well combined. Add vanilla and mix.
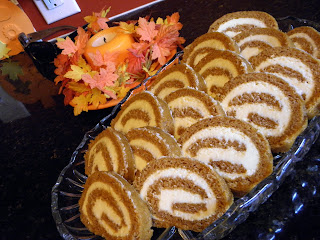
Unroll cake, spread filling, leaving about 1" at the short end that will be on the very outside edge (so the cake will "trap" the filling along the entire outside edge). Reroll - minus the towel! Sprinkle the outside with powdered sugar and wrap in saran wrap - the powdered sugar will stop the cake from sticking to the saran wrap. Refrigerate overnight (WAY in the back so your husband and kids won't find it and eat it all before you get a chance). Slice in 1/2" thick slices. Take to a get-together and prepare yourself for the compliments. :)
If you're making 2, make the cakes individually. Start the second batch when the first cake is done. By the time you're ready to pour it into the pan, the pan will have cooled enough to be ready for it. Be sure to heavily re-grease the pan again. Also, scrape any remnants of the cake from the pan before greasing it. Getting the second cake not to stick is trickier than the first. You can make the filling in a double batch and just split it between the cakes when they both have cooled.


